A step-by-step instruction template will give you a solid foundation on which to build your own instructions.
An application like Folge for creating step-by-step guides using screenshots will enable you to create a template in no time at all.
Inevitably, this will also save you time in the long run. Once you have a template, simply fill in the blanks with your own content.
In this article you will find:
- A free step-by-step instruction template you can copy and use right away
- A real example of step-by-step instructions, filled in end to end
- What a step-by-step instruction guide is and what it should include
- How to create your own guide template (with pictures)
- The best tool for creating step-by-step guides
This article is for:
- IT support teams looking to streamline troubleshooting processes.
- Customer success specialists seeking to improve user adoption and satisfaction.
- Onboarding specialists aiming to make new hire training more efficient.
- Educators wanting to create more engaging and effective lesson materials.
- Business professionals needing to produce clear and concise documentation.
What is a step-by-step instruction guide?
A step-by-step guide (also known as a step-by-step instruction guide) is a structured document designed to assist individuals in completing a task or achieving a specific goal by breaking down the process into sequential, manageable steps.
Free step-by-step instruction template (copy & use)
Copy the template below into any document - Word, Google Docs, or your documentation tool - and fill in the blanks. It contains every element a clear instruction document needs, in the order readers expect it.
[Title: How to <do the task>]
Goal: What the reader will have accomplished when they finish.
Who this is for: The role or audience this applies to.
Time needed: Estimated duration.
Before you start, you'll need: Accounts, permissions, tools, or files required.
Steps:
Step 1 - <short action-first name>
Do <action> in <location>. [Screenshot showing exactly where to click]
Expected result: what the reader should see if the step worked.
Step 2 - <short action-first name>
Do <action>. [Screenshot]
Expected result: …
Step 3… (repeat for each step - one action per step)
Troubleshooting: The 2–3 most common problems and their fixes.
Related guides: Links to the next task the reader usually needs.
Last updated: Date and author, so readers can trust it's current.
Two rules make this template work: one action per step (if a step contains the word "and", it is probably two steps), and a picture for every step that happens on a screen.
Example of step-by-step instructions (filled in)
Here is the same template filled in for a simple, real task - the kind of instructions an IT team sends to every new employee:
How to set up your email signature in Gmail
Goal: Every email you send shows the standard company signature.
Who this is for: All new employees.
Time needed: 3 minutes.
Before you start, you'll need: Your company Google account and the signature text from the onboarding email.
Step 1 - Open Gmail settings
In Gmail, click the gear icon in the top-right corner, then click See all settings.
Expected result: the Settings page opens on the General tab.
Step 2 - Create a new signature
Scroll down to the Signature section and click + Create new. Name it "Work".
Expected result: an empty signature editor appears.
Step 3 - Paste the company signature
Paste the signature text from your onboarding email and replace the name and job title with your own.
Expected result: the preview shows your personalized signature.
Step 4 - Set defaults and save
Under Signature defaults, select "Work" for both new emails and replies, then scroll down and click Save Changes.
Expected result: sending a test email to yourself shows the signature at the bottom.
Troubleshooting: If the signature doesn't appear, check that "Work" is selected under Signature defaults - Gmail saves signatures without applying them by default.
Last updated: July 2026, IT team.
In a real guide, each step would also include a screenshot with the click target highlighted. Capturing those is the tedious part - which is exactly what Folge automates: perform the task once, and every click becomes a numbered step with an annotated screenshot.
How can you create a step-by-step instruction template?
To create a step-by-step instruction template, you should use a platform that enables you to quickly produce tutorials and step-by-step guides.
With all the tools you need in one location, you can easily add screenshots, videos, and text to your instructions.
Once you're happy with the results, you can then share your guide with others in a range of formats.
For instance, using Folge, you can share step-by-step guides in a variety of different formats, including PDFs, rich HTML files, and Microsoft Word documents.
You can use Folge to capture your Windows or Mac screen to create a step-by-step guide.
With Folge, you can do the following:
- Capture your screen with mouse clicks and keypresses.
- Choose to delay the capturing of screenshots.
- Collect a sequence of screenshots all at once.
- Pick whether you capture the entire screen or a certain part.
What should a “how-to” guide include?
Any template for step-by-step instructions should have five key components:
- 1. A range of photos or screenshots for each step.
- 2. A clear description of what you aim to achieve.
- 3. A format that is easily digestible.
- 4. A handful of links for additional information.
- 5. An ordered list to summarize all steps.
Here are five more components to also consider.
1 - Catchy title
The title of your guide will be the first thing that people see. As such, it's important to make it count. Use a title that accurately reflects the content of your guide, while also being eye-catching and attention-grabbing.
Sure, it's not the most important part of your guide - but if you are trying to encourage employees or customers to engage with your content, a catchy title is a good place to start.
2 - Brief introduction
A brief introduction will set the stage for what's to come and explain the purpose of your guide. It doesn't need to be anything too long or complicated - just a couple of sentences that give the reader an overview of what they can expect.
You should highlight the things the reader will need to complete the process or task. From software solutions to physical equipment, it's important to list everything here so that the reader knows what they need to get started.
Actionable Tip: Start with a question or a relatable scenario. For instance, "Ever wondered how to get started with XYZ software?" This approach engages the reader right from the get-go, making them more likely to proceed with the guide.
3 - Tips for success
By setting the reader on the right path, you can increase the chances of success. After all, if they know what to do and what not to do, they are more likely to achieve the desired outcome.
Include a few tips for success in your guide - these could be general tips, or specific pointers that relate to the task at hand. Either way, make sure that your tips are clear and concise.
Actionable Tip: Use bullet points or numbered lists for clarity. Readers often skim content, and presenting your tips in a digestible format ensures that they grasp the essential details. Consider using icons or graphics to emphasize each tip visually.
4 - Screenshots
No digital tutorial is complete without some screenshots to guide the reader through the process. Screenshots are especially important if you are dealing with software since they provide a visual guide for the reader.
You can take the reader through each step of the process, highlighting key points along the way. If some steps happen on a phone, such as approving a sign-in in an authenticator app, take the screenshots there and move them to your computer with sharedclipboard, then add them to your guide.
5 - Conclusion
A conclusion is an opportunity to summarize the key points of your guide and leave the reader with something to think about.
From key considerations to take into account to troubleshooting advice, a conclusion is a great way to wrap up your guide and ensure that the reader has all the information they need to take the reins.
For instance, if your step-by-step guide is designed for employee onboarding, you could add a personal touch to the conclusion by wishing the reader all the best in their new role.
If you are creating a step-by-step guide for SaaS product users, you might want to provide some additional resources that they can use to get the most out of the SaaS solution.
A simple step-by-step guide can help users unlock value from your product quickly. With the right software documentation tool, you can create engaging content that will help users become more familiar and comfortable with your product faster. When it comes to engaging users and inspiring activation, nothing beats an intuitive user manual or quick-start guide.
Actionable Tip: Recap the primary objective and outcome of following the guide. Then, consider posing a reflective question or encouraging feedback. For instance, “Did you find this guide helpful? Let us know how we can improve.” This not only wraps up the content but also opens a channel for user feedback and engagement.
How do you create a guide template?
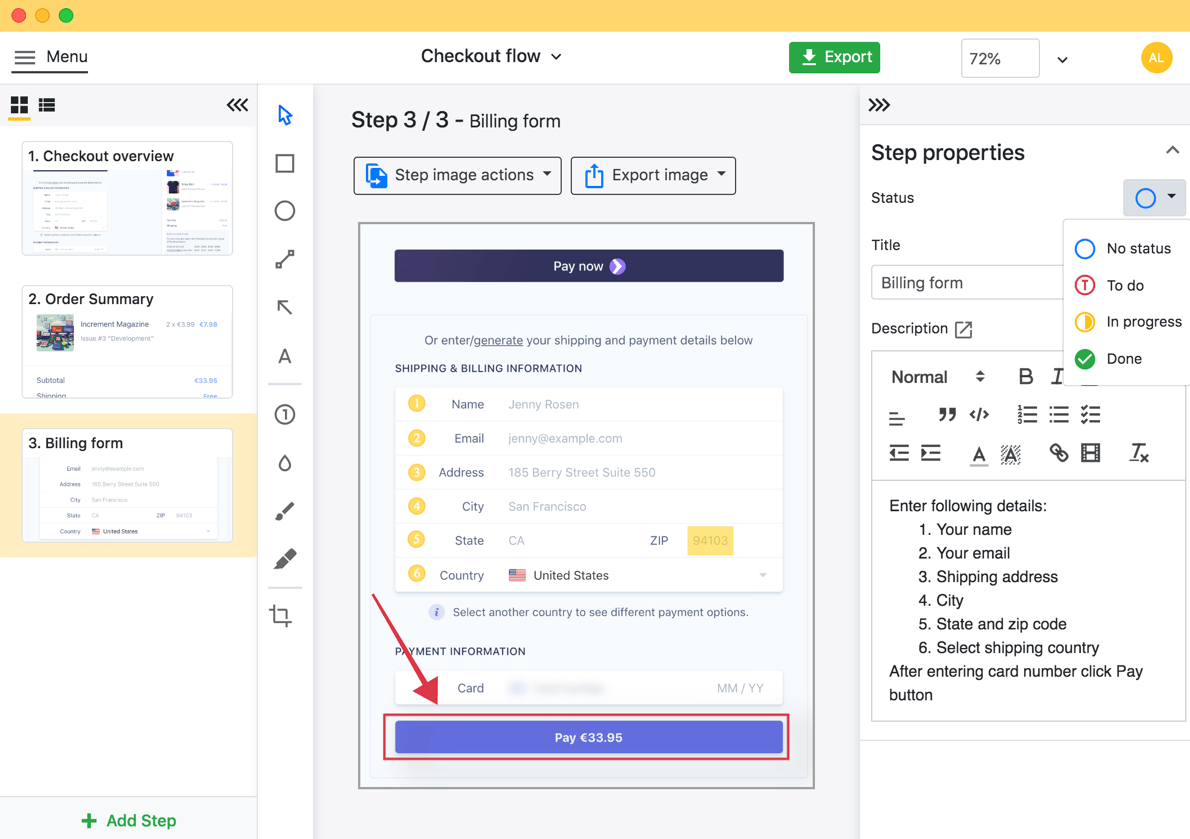
You can use a tool like Folge to create effective how-to guides.
Creating an effective how-to guide can be a game-changer for your readers or users.
Whether you're breaking down complex tasks or offering step-by-step instructions for a particular process, these tips will ensure your guide is easy to follow and provides value.
Here are some additional tips:
- 1. Utilize a platform that enables you to create how-to guides.
- 2. Amass a selection of screenshots for inclusion in the guide.
- 3. Consider ways to remove steps and shrink the process.
- 4. Edit and revise the how-to guide for extra clarity.
- 5. Test the guide on someone who is new to the process.
Let’s dive into each of the five tips:
1 - Utilize a Platform Suitable for Creating How-To Guides
Choosing the right platform is essential when creating a how-to guide. A dedicated process documentation platform like Folge offers tools and features specifically tailored for guide creation.
With such platforms, you can easily structure your content, integrate various multimedia, and ensure the guide is accessible across different devices.
2 - Amass a selection of screenshots for inclusion in the guide
Visuals play a pivotal role in understanding. Including relevant screenshots can help readers grasp concepts quickly and ensures they are following the steps correctly.
Make sure your screenshots are clear, focused on the essential elements, and appropriately annotated to highlight significant areas or actions.
3 - Consider Ways to Remove Steps and Shrink the Process
Simplicity is the key to an effective how-to guide. Evaluate your process and identify any steps that might be redundant or unnecessary.
By shortening the process, you not only make it easier for the reader to follow but also reduce the margin for errors or confusion.
4 - Edit and Revise the How-To Guide for Extra Clarity
Once your guide is drafted, take the time to review and refine it. Look for areas that might be unclear or need more detailed explanations.
An external perspective can also be beneficial, so consider having a colleague or editor review the guide. This process ensures that the language is straightforward, steps are clear, and there's no room for ambiguity.
5 - Test the Guide on Someone Who Is New to the Process
Before finalizing your guide, have someone unfamiliar with the process test it out. Their fresh perspective will help identify any areas of confusion or steps that might need further clarification.
This testing phase is crucial in ensuring your how-to guide is foolproof.
Creating how-to guides doesn't have to be complicated - with a few key ingredients, you can create a guide that covers everything your reader needs to know.
It all begins with using a process documentation platform like Folge.
What is the best tool for creating step-by-step guides?
With a drag-and-drop editor, Folge enables you to create new steps on the fly and add screenshots with just a few clicks.
Folge also makes it easy to edit and revise your guide as needed. You can use the built-in rich WYSIWYG editor to communicate your ideas in an unlimited number of ways.
Best of all, Folge is free to use - so why not give it a try today? You can create, manage, and share process documentation in no time at all.
Frequently Asked Questions
What is a step-by-step instruction?
A step-by-step instruction is a document that breaks a task into a sequence of clear, numbered actions. Each step covers one action, states where to perform it, and shows the expected result - so anyone can complete the task correctly without prior knowledge.
How do you write step-by-step instructions?
Name the task, list what the reader needs before starting, then write one numbered step per action, starting each step with a verb ("Click…", "Open…", "Select…"). Add a screenshot for every on-screen step, state the expected result, and test the instructions on someone unfamiliar with the task.
What should a step-by-step instruction template include?
A title, the goal, the audience, prerequisites, numbered steps (one action each, with a visual per step), expected results, a short troubleshooting section, and a last-updated date. You can copy the free template above.
How do I create step-by-step instructions with pictures?
The manual way is to take a screenshot at every step, annotate the click target, and paste it under the step text. The fast way is a capture tool like Folge: perform the task once and it records every click as a numbered step with an automatically annotated screenshot, exportable to Word, PDF, or HTML.
Are you ready to get started? Download Folge for free today.